How to Use a Dual-Ended Brush: The 2-in-1 Tool That Replaces Half Your Brush Roll
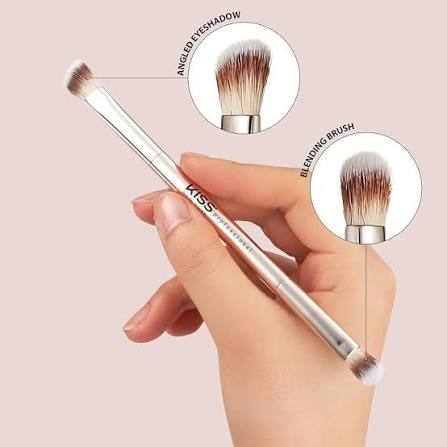
If your makeup bag is overflowing with brushes you rarely reach for, it might be time to rethink your kit. Dual-ended brushes have become one of the most practical innovations in makeup tools, streamlining routines without compromising on the precision artists and everyday users expect. Below, we break down why this 2-in-1 format is worth the switch, and exactly how to use one for a flawlessly contoured finish.
Dual-ended brush vs. single brushes: why the 2-in-1 format wins
Anyone who has tried to travel with a full makeup kit knows the struggle: a bulky brush roll, a dozen handles, and half of them barely get used. That’s the case for the dual-ended brush, a format that’s quickly becoming a staple for makeup lovers who want fewer tools without sacrificing precision.
A dual-ended brush combines two distinct heads on a single handle, usually pairing a larger, softer end for blending broad areas with a smaller, firmer end for detail work. Compare that to a traditional single-headed brush setup, where you’d need one brush for contour, another for concealer, and a third for precision blending under the eyes or along the nose. The 2-in-1 format collapses all of that into one tool.
The advantages go beyond convenience. Because both ends are fixed to the same handle, there’s a natural consistency in quality and control between the two functions. There’s also less clutter in your makeup bag, less to wash, and less guesswork about which brush does what. For makeup artists and everyday users alike, a well-designed precision contour brush can genuinely replace two or three separate tools, making it one of the smarter additions to any collection of makeup brush essentials.
How to use a dual-ended contour/precision brush: step by step
Getting the most out of a dual-ended contour and precision brush comes down to understanding what each end is built for and using them in the right order.
Step 1: Start with the larger end for contour. Apply your cream or powder contour product to the fuller, tapered side of the brush. Sweep it along the hollows of your cheeks, the sides of your forehead, and your jawline using light, buffing motions to blend the product into your skin without harsh lines.
Step 2: Build and diffuse. Go back over the contoured areas with gentle circular motions. The soft bristles on this end are designed to melt product into skin for a soft-focus finish rather than a stripe of color.
Step 3: Switch to the precision end for detail work. Flip to the smaller, firmer side to sharpen the areas that need more definition, like the sides of the nose, under the cheekbones, or along the jaw. This end is also ideal for concealer placement and setting powder in tight spots like the inner corners of the eyes.
Step 4: Clean edges and blend transitions. Use light tapping motions with the precision end to soften any harsh edges left from the broader application, making sure the transition between contoured and natural skin looks seamless.
Step 5: Finish with a glow. Once your contour is blended, many makeup artists like to finish the look by sweeping a bit of body shimmer along the collarbones or shoulders for an extra dimension of radiance that complements a sculpted face.
With the right dual-ended tool and a little practice, you can achieve a fully contoured, precision-blended look using a single brush, saving both time and space in your routine.
